10 MINUTOS DE LECTURA
Crea tu marca a través de una tienda en línea
Cómo crear escaparates personalizados y páginas de detalles de productos en Amazon
39 € (sin IVA)/mes más tarifas de venta adicionales
Pasos para crear la tienda con tu marca
Sigue estos pasos para mostrar tu marca en Amazon. Sigue leyendo para obtener más instrucciones.
- Empezar: Crea una cuenta de vendedor profesional.
- Inscribe tu marca en el Registro de marcas en Amazon.
- Añade productos y utiliza contenido A+ para personalizar tus listings de Amazon.
- Crea un escaparate exclusivo para tu marca con la herramienta Amazon Stores.
Pasos adicionales:
- Optimiza la experiencia de marca móvil de tus clientes.
- ¿Y ahora qué? Utiliza más herramientas para hacer crecer y distinguir tu marca, todas ellas incluidas en tu cuenta de vendedor.
Empezar: Crear una cuenta Professional
Amazon es una tienda muy conocida, lo que la convierte en una gran oportunidad para los vendedores en línea. De hecho, colaboradores comerciales independientes vendieron más de mil millones de artículos sólo durante la temporada navideña de 2019, utilizando Amazon para llegar a cientos de millones de clientes, crear sus marcas y hacer crecer sus empresas.
Aun así, puede resultar un poco intimidante iniciar un negocio en línea.
Aun así, puede resultar un poco intimidante iniciar un negocio en línea.
¿Nuevo en Amazon? Regístrate para obtener una cuenta profesional
Una de las mejores formas de destacar y causar una buena impresión en Amazon es vender tu propia marca de productos. Eso no sólo te proporcionará la oportunidad de vender tu producto exclusivo, sino que también hemos creado muchas herramientas gratuitas que te permiten crear una tienda en línea para tu marca, además de proteger tu marca, mostrar tus productos y conectar con los clientes.
A continuación puedes ver un ejemplo de tienda de marca.
A continuación puedes ver un ejemplo de tienda de marca.

A continuación, para mostrar tu marca en Amazon sin disminuir tu estilo, tendrás que:
Vamos a profundizar un poco en cada una de estas tareas.
Inscribe tu marca

El Registro de marcas en Amazon ayuda a proteger la propiedad intelectual y la reputación de tu marca en Amazon.
El Registro de marcas en Amazon registra automáticamente tu marca en todos los países europeos sin costes adicionales.
Asimismo, añadir tu empresa al Registro de marcas te permite acceder a todas las herramientas, informes y ventajas gratuitas que implica vender tu marca en la tienda de Amazon.
Para inscribir tu empresa en el Registro de marcas en Amazon, necesitarás:
- Una cuenta de vendedor de Amazon (regístrate ahora).
- Una marca registrada activa en el país en el que quieres inscribirte o una solicitud de marca registrada pendiente presentada a través de Amazon IP Accelerator.
- El nombre o logotipo de tu marca ubicado de forma destacada en tus productos y embalajes.
Si cumples los criterios, aquí te indicamos cómo registrarte en el Registro de marcas en Amazon:
- Dirígete a https://brandservices.amazon.es/brandregistry/eligibility y haz clic en "Inscribirse ahora".
- Elige el sitio web específico del país en el que quieres inscribir tu marca.
- Sigue las indicaciones para iniciar sesión en Seller Central.
- Rellena el breve formulario con la información sobre tu empresa tal como aparece en los documentos legales o en las solicitudes de marca comercial.
- Una vez que envíes el formulario, se te redirigirá a la página Registro de marcas conectada a tu cuenta de vendedor. Selecciona Gestionar >> Inscribir una marca.
- Sigue los pasos para enviar tu inscripción a revisión.
La información que proporciones durante la inscripción dependerá del sitio web específico del país en el que quieras inscribirte. En España, por ejemplo, el Registro de marcas en Amazon solicita:
- Número de registro de la marca en la Oficina de Patentes y Marcas de España (OEPM)
- Las "señas de identidad de la marca", que podrían ser palabras, texto, imágenes o diseños (por ejemplo, un logotipo).
- Categorías de productos en las que deben publicarse los productos de tu marca, por ejemplo, ropa, artículos deportivos, electrónica, etc.
- Países en los que se fabrican y distribuyen los productos de tu marca.
Personaliza las páginas de detalles de los productos con contenido A+

Una vez que tu marca haya sido aprobada para inscribirse en el Registro de marcas en Amazon es cuando empieza la diversión. El Registro de marcas desbloquea herramientas gratuitas que te ayudarán a gestionar los productos de tu marca entre bastidores, así como a gestionar la historia de tu marca que ven los clientes que compran en la tienda de Amazon.
Gracias al contenido A+ y a Amazon Stores, puedes crear una experiencia de marca óptima en Amazon. El contenido A+ mejora tus listings de productos, mientras que Amazon Stores te permite crear una experiencia de compra de varias páginas dentro de la tienda de Amazon.
Gracias al contenido A+ y a Amazon Stores, puedes crear una experiencia de marca óptima en Amazon. El contenido A+ mejora tus listings de productos, mientras que Amazon Stores te permite crear una experiencia de compra de varias páginas dentro de la tienda de Amazon.
Cuando añadas un producto a la tienda de Amazon, los clientes verán la oferta en una página de detalles del producto. La versión estándar tiene un aspecto similar a este:

Con el contenido A+, puedes mejorar la página de detalles del producto añadiendo diseños de tu propia marca para crear algo similar a esto:

Añade contenido A+ a los productos de tu marca en Amazon siguiendo estos pasos:
- Inicia sesión en Seller Central.
- En el menú de navegación, selecciona Anuncios >> Contenido de marca enriquecido
- Introduce el SKU del producto al que quieres añadir contenido. Si añades contenido al nivel principal, la plantilla se publicará también en todos los niveles secundarios.
- Selecciona uno de los módulos disponibles o una de las plantillas predefinidas
- Sigue las indicaciones que aparecen en la parte superior de la página: Añade imágenes que aprovechen al máximo el espacio asignado, y añade texto en los cuadros de texto designados para describir los detalles o las características del producto.
- Previsualiza la página para asegurarte de que todas las imágenes se cargan correctamente y de que tiene el mismo aspecto que el resto de tus páginas de marca, para ofrecer a los clientes una experiencia coherente con tu marca.
- Envíala a Amazon. La revisión puede tardar 7 días hábiles (más durante los períodos de máxima actividad) y el estado del contenido se actualizará en tu panel. El contenido aprobado puede tardar 24 horas en aparecer.
- Si no se aprueba el envío de contenido, selecciona "editar" en el panel para modificar la página y, a continuación, vuelve a enviarla. Para evitar tener que editar y volver a enviar el contenido, asegúrate de que tu contenido:
- Tiene imágenes nítidas que son visibles en ordenadores y en dispositivos móviles
- No contiene errores ortográficos ni gramaticales
- No contiene detalles específicos de precios ni de promociones
- No hace referencia a garantías, atención al cliente, sitios web ni información de contacto
- Cumple con las directrices A+
Consejos sobre cómo utilizar las funciones del contenido A+:
- Texto: Proporciona explicaciones detalladas con palabras y números específicos para ayudar a los clientes a convertirse en expertos en tu producto.
- Tablas: Utiliza tablas de comparativas para resaltar características en toda la línea de productos.
- Banners: Utiliza banners con imágenes para mostrar cómo se usan tus productos. Añade el logotipo de tu marca y su contenido a todos tus productos para crear una experiencia de marca coherente.
- Imágenes: Utiliza imágenes de alta resolución y con calidad profesional, que resalten las características del producto o enseñen cómo usarlo. Si añades texto de marca a tus imágenes, asegúrate de que sea lo suficientemente grande como para poder leerlo en dispositivos móviles.
- Campos: Utiliza campos de texto, en lugar de incrustar texto en imágenes, para mejorar tu visibilidad en los resultados de búsqueda (SEO).
- Mezcla y combina: Los módulos de contenido A+ ofrecen más de 100 combinaciones de campos de imagen y texto. Explóralos todos para encontrar la combinación adecuada para tu marca.
- Recopila reseñas: Utiliza la información de las reseñas, las devoluciones y las comunicaciones de los clientes para averiguar qué temas tratar. Eliminar las barreras de compra. Piensa en motivos por los qué los clientes no comprarían tu producto y encárgate de ellos con antelación.
- Cuenta una historia: Describe el objetivo, la historia y el proceso de producción que hacen única a tu marca. Proporciona información detallada sobre las características con datos específicos. Emplea un tono que resulte útil e informativo.
Crea una tienda para tu marca dentro de la tienda de Amazon

Amazon es una tienda en línea, y las marcas que venden productos en la tienda de Amazon pueden crear su propia tienda en línea dentro de Amazon con una herramienta gratuita llamada Amazon Stores.
Una vez que hayas creado una cuenta de vendedor y te hayas inscrito en el Registro de marcas en Amazon, puedes crear una tienda que ofrezca a los clientes una experiencia inmersiva de varias páginas. El objetivo es que los clientes conozcan la historia de tu marca y el catálogo completo de productos a través de archivos multimedia enriquecidos y personalizados: texto, imagen y vídeo.
También obtendrás tu propia dirección web de amazon.es para utilizarla en campañas de marketing (amazon.es/tumarca). Considera esta dirección como tu propiedad dentro de Amazon, en la que puedes mostrar nuevos productos y los productos más vendidos, e incluso ofrecer recomendaciones personalizadas a los compradores que la visiten.
Entre bastidores, Amazon Stores también te proporciona métricas de rendimiento sobre visitas, fuentes de tráfico y ventas para que puedas optimizar la experiencia.
Con Store Builder en Seller Central, puedes crear un escaparate de comercio electrónico en Amazon, sin necesidad de tener experiencia en codificación ni diseño. La página se configura automáticamente para navegadores de escritorio, de dispositivos móviles y de tabletas.
Crea tu propia experiencia de marca con Amazon Stores siguiendo estos pasos:
- Crea una cuenta de vendedor e inscribe tu marca en el Registro de marcas en Amazon.
- Inicia sesión en Seller Central.
- En el menú de navegación, selecciona Stores >> Gestionar tiendas
- Haz clic en el botón "Crear tienda".
- Elige una plantilla para tu tienda. Cada una incluye cuadros ajustables para imágenes, texto, vídeo y otros tipos de contenido. Las opciones de plantilla incluyen:
- Cuadrícula de productos: una forma sencilla de mostrar la selección de tu marca.
- Marquesina: incluye una exposición de productos seleccionados con espacio adicional para imágenes, descripciones de productos y citas de clientes.
- Escaparate: una opción flexible para marcas con una amplia selección de productos, con mucho espacio para incluir información sobre productos y contenido visual enriquecido.
- Abre el Creador de Amazon Store para crear una tienda en línea para tu marca dentro de la tienda de Amazon.
- Haz clic en el Gestor de páginas y selecciona "Añadir una página" para añadir una página a tu tienda en línea. Introduce el nombre y la descripción de la página y elige una plantilla de página.
- Utiliza el Gestor de cuadros para añadir contenido a la página y organizarlo. Combina imágenes, texto y vídeo de productos para crear una experiencia atractiva.
- Elige productos para mostrarlos en tu tienda o usa widgets dinámicos para rellenar automáticamente diferentes presentaciones de productos, como productos más vendidos o recomendaciones basadas en el comportamiento de los visitantes. Los widgets dinámicos utilizan datos de Amazon, como la búsqueda de palabras clave, los productos más vendidos o el historial de recomendaciones para ayudarte a optimizar y actualizar los productos que aparecen en tu tienda.
- Utiliza la Ventana de previsualización para ver cómo aparecerá tu tienda en navegadores de escritorio y de dispositivos móviles. Haz clic en un cuadro individual de la página para editarlo.
- Repite los pasos del 5 al 7 para crear varias páginas en tu tienda si necesitas mostrar diferentes características, categorías de productos, productos más vendidos, etc. Cada página puede dirigir a otra página dentro de tu tienda, con una profundidad de hasta tres niveles.
- Una vez que hayas terminado de crear tu tienda, haz clic en "Enviar para su publicación". Publicar tu tienda online implica un proceso de moderación que puede tardar varios días. Vigila la Barra de estado para supervisar el progreso. Para evitar rechazos durante la moderación, revisa las Pautas de creación.
- Una vez que tu tienda esté activa, ve a Creador de Amazon Store >> Información para ver cómo funciona tu tienda en línea. Realiza un seguimiento de las visitas a la página, los visitantes, las fuentes de tráfico y las ventas para actualizar y optimizar tu tienda.
Pasos adicionales

Optimiza tu tienda para dispositivos móviles
Los consumidores pasan cada vez más tiempo en sus dispositivos móviles, lo que está impulsando el crecimiento del comercio minorista móvil. Los dispositivos móviles han cambiado la forma en que las personas compran. En el primer trimestre de 2020, dos tercios de las visitas a la tienda se realizaron desde un dispositivo móvil.1
Con un número tan grande de compradores que utilizan dispositivos móviles para acceder a tu tienda, tiene sentido priorizar un diseño apto para dispositivos móviles.
Sabemos que, con la innumerable cantidad de tamaños de pantalla, resoluciones, tipos de dispositivos y navegadores, el diseño para clientes móviles y de escritorio es complejo y evoluciona constantemente. Para ayudarte a empezar, queremos compartir contigo 6 consejos del equipo de diseño de Amazon Stores que te permitirán optimizar tu tienda para compradores móviles.
1 Datos internos de Amazon a nivel mundial en 2020.
6 consejos para optimizar tu tienda para dispositivos móviles
Pruébala en un dispositivo móvil
Probar tu tienda en un dispositivo móvil te ayudará a descubrir errores que pueden afectar a la experiencia de los compradores móviles. La mejor manera de hacer los ajustes correctos es descubriendo por ti mismo qué tipo de experiencia proporciona tu tienda a los clientes en dispositivos móviles. Deja a un lado el ordenador de sobremesa o el portátil y accede a tu tienda desde un teléfono móvil o una tablet. Navega por las distintas páginas y cuadros. ¿Es fácil navegar por tu tienda? ¿Los textos y gráficos son fáciles de leer?
Para probar la experiencia de tu tienda:
1. Haz clic en Vista previa > Compartir vista previa en el Creador de Amazon Store.

2. Copia el enlace de vista previa
3. Pega este enlace de vista previa en un correo electrónico o en cualquier lugar al que puedas acceder desde tu teléfono móvil (Consejo: Incluye la contraseña del enlace de vista previa en una línea separada para que sea más fácil copiarla e introducirla más adelante).
4. Navega por tu tienda desde el dispositivo móvil, como si fueras un comprador, y toma notas sobre lo que haya que mejorar. ¿Es fácil de navegar? ¿Puedes encontrar los productos o la información que estás buscando? ¿Cómo se ven las imágenes en un dispositivo móvil?
Utiliza la opción de diseño móvil personalizado
Debido a la diferencia de tamaño de pantalla entre un monitor de sobremesa y una pantalla de teléfono móvil, en ocasiones un diseño de cuadros se ve bien en el ordenador pero no en el dispositivo móvil. Aunque Amazon Stores ajustará automáticamente las imágenes para diferentes tamaños de pantalla, esto no significa que todos los elementos se puedan ver bien en dispositivos móviles, especialmente si el texto ya resulta pequeño en el ordenador.
En estos casos, recomendamos utilizar la opción de diseño móvil personalizado del Creador de Amazon Store. Te permitirá añadir dos imágenes independientes, una optimizada para escritorio y otra para dispositivos móviles. Esta opción sólo está disponible para cuadros de imágenes y se puede encontrar deslizando hacia abajo en el panel "Edición de imágenes".
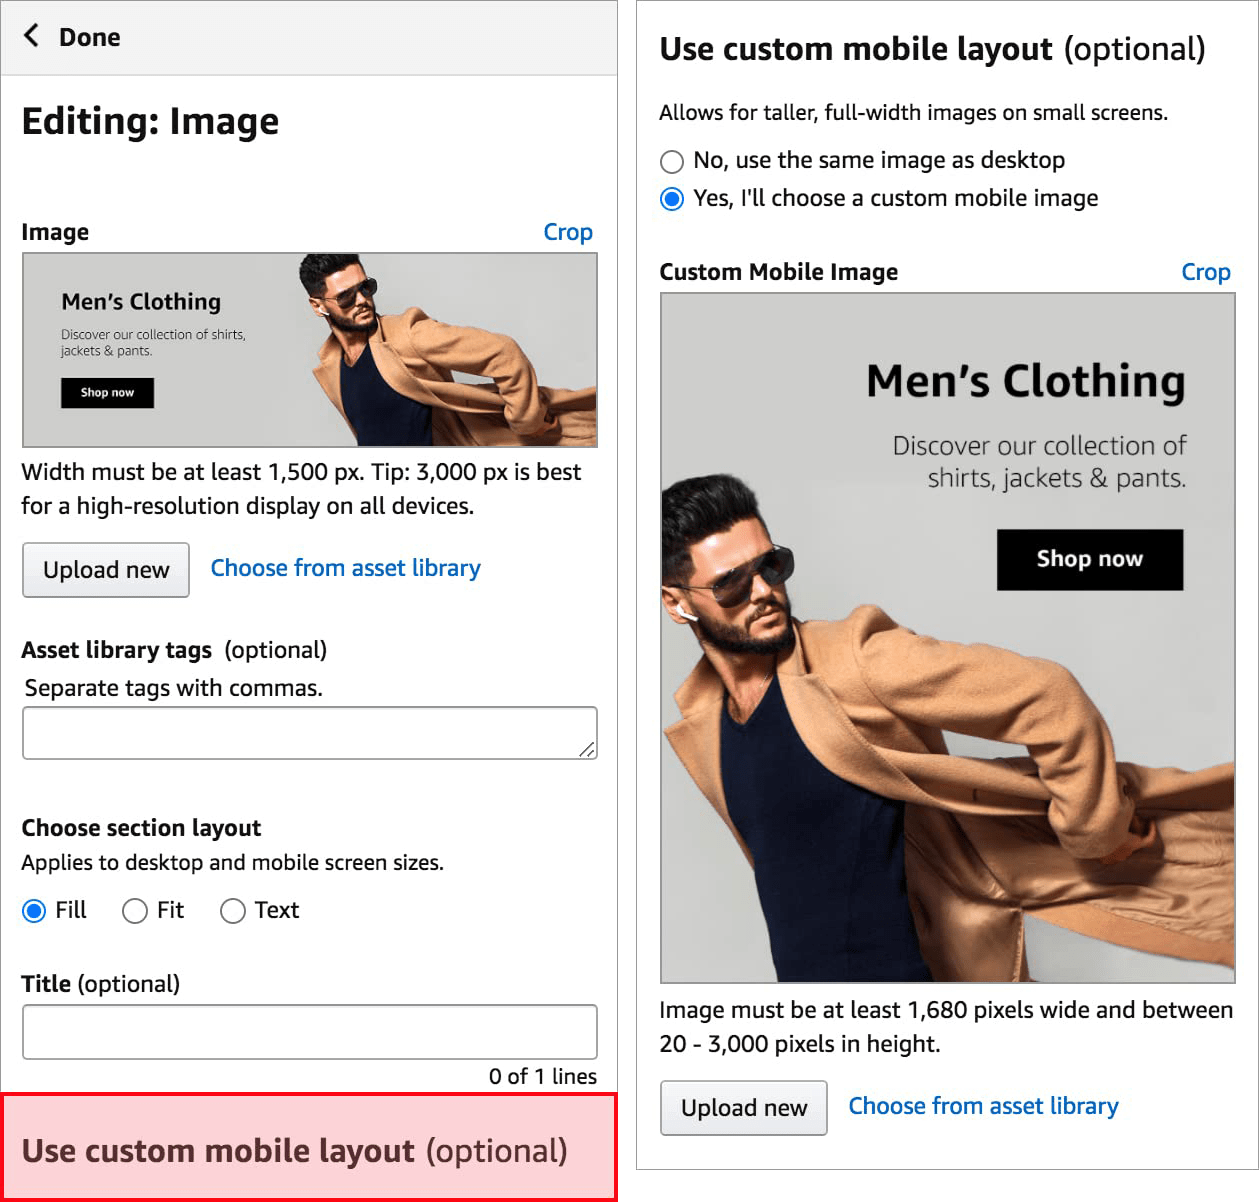
Ejemplo de diseño móvil personalizado:

Asegúrate de que el contenido aparezca en el orden correcto
Las pantallas móviles son más estrechas y están diseñadas para desplazarse más rápidamente, lo que significa que el orden y la disposición del contenido no son exactamente iguales en la tienda para ordenadores de escritorio y dispositivos móviles. Las tiendas móviles utilizan una priorización de filas de izquierda a derecha para distribuir el contenido. A continuación, se muestra un ejemplo.

Revisa tu tienda en un dispositivo móvil para confirmar que el contenido aparece en el orden correcto.
Optimiza la imagen del encabezado
Incluso con un diseño móvil personalizado, sólo puedes utilizar una única imagen para el encabezado. La imagen del encabezado tiene 3000 píxeles de ancho en escritorio, y se reduce automáticamente a la mitad (1500 píxeles) en móvil. Este cambio de tamaño dinámico reduce todos los elementos gráficos del encabezado, incluido el texto.
Debido a esto, ten en cuenta lo siguiente:
- Intenta limitar el número de productos de un encabezado a tres. Cuantos más productos incluyas en el encabezado, más saturado se verá en el dispositivo móvil.
- El texto que incluyas en el encabezado debe tener menos de 30 caracteres, de modo que puedas aumentar el tamaño del texto para que sea legible en las versiones móvil y de escritorio sin sobrecargar el encabezado. Para ello, recomendamos un tamaño de fuente mínimo de 100 puntos en Arial o equivalente.
Elige una ubicación eficaz para las llamadas a la acción (CTA)
Las investigaciones han mostrado que los lectores suelen leer de arriba a abajo, y de izquierda a derecha. Tener en cuenta este flujo de lectura puede ayudarte a elegir una ubicación eficaz para tu botón de llamadas a la acción (CTA) en el móvil.
Ten en cuenta la importancia de los elementos de la primera parte de la página, que es la parte de la página de la tienda que se puede ver antes de deslizar hacia abajo. Si se coloca un botón de CTA en la parte inferior de una caja vertical, es poco probable que aparezca en la primera parte, lo que reducirá su visibilidad para los clientes.
Los botones de CTA en dispositivos móviles también deberían tener un espacio decente alrededor de ellos, o "espacio para respirar", para que los clientes puedan encontrarlo y pulsarlo con facilidad. Un espacio limitado para un botón CTA puede hacer que se fusione con su entorno y pierda predominancia y visibilidad.
Ofrece alternativas a la navegación por el menú
El menú de navegación de una tienda aparece de forma diferente en la versión de escritorio y la móvil. En escritorio, los compradores pueden ver varias pestañas a lo largo de la barra de navegación. En dispositivos móviles, los compradores ven un único menú desplegable. Consulta las imágenes de abajo para obtener una comparación.
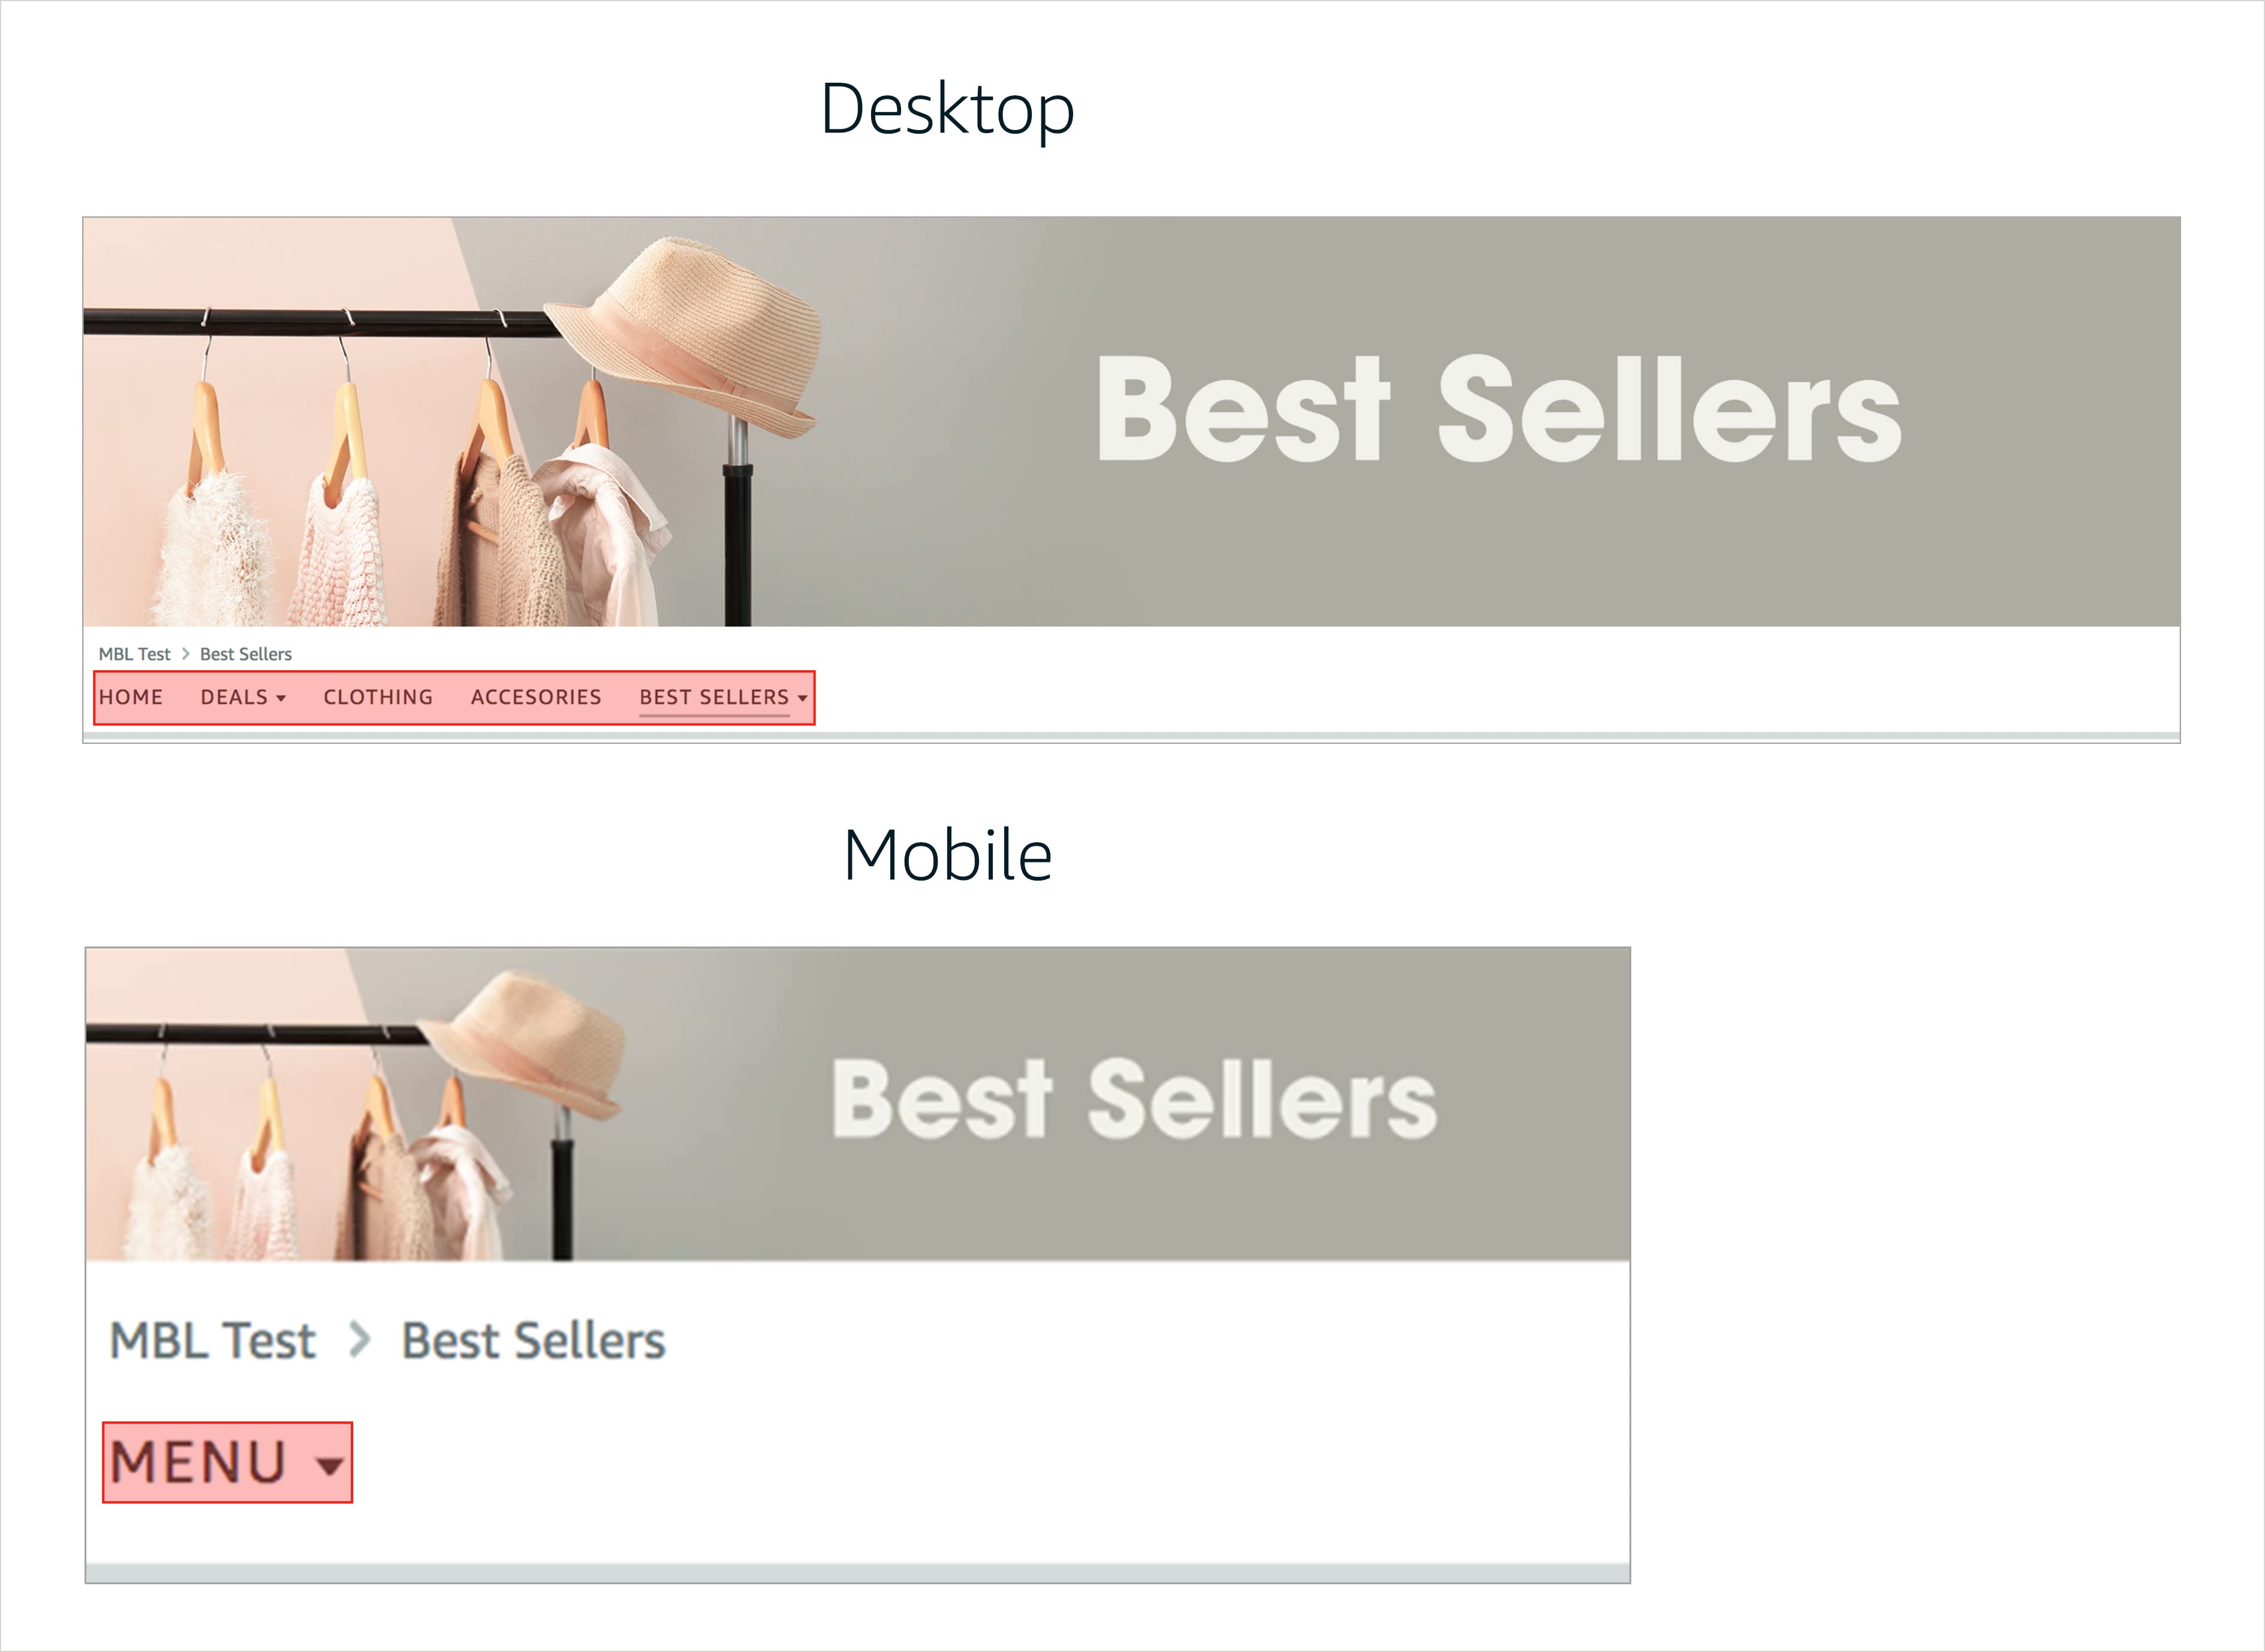
Es un factor importante que debes tener en cuenta a la hora de resaltar las principales categorías o pestañas de una tienda. Poner las páginas principales en el menú es una buena estrategia, pero también puedes usar cuadros de imágenes o de texto para crear una forma adicional de navegar por tu tienda. Al añadir estos cuadros en la parte superior de tu tienda, junto con un botón CTA bien visible, los compradores pueden encontrar el contenido más importante aunque no amplíen el menú desplegable.
¿Listo para empezar a optimizar la experiencia móvil de tu tienda?
¿Y ahora qué? Utiliza más herramientas para hacer crecer y destacar tu marca
Estás inscrito en el Registro de marcas en Amazon. Tu negocio de comercio electrónico tiene un escaparate de Amazon y tu propia dirección web de amazon.es Las páginas de detalles de tus productos incluyen información enriquecida añadida mediante contenido A+.
¿Y ahora qué?
Una vez que hayas creado una tienda en línea dentro de la tienda de Amazon, aprovecha las muchas otras herramientas de marketing de comercio electrónico y para vendedores en línea que hemos creado para ayudar a las marcas a llegar a más clientes.
Aumenta el tráfico a tu tienda y a tus listings de productos de Amazon mediante Sponsored Brands (Marcas Patrocinadas), Sponsored Products (Productos Patrocinados) y otras estrategias de Amazon Advertising. Utiliza tu URL de Amazon exclusiva para campañas de marketing dentro y fuera de Amazon.
Empieza a vender hoy mismo
25 GBP (IVA no incluido) al mes + tarifas de venta


En este sitio, utilizamos cookies y herramientas similares (conjuntamente, "cookies") para brindarte y mejorar los servicios, así como para mostrarte anuncios. Para obtener más información sobre cómo emplea Amazon las cookies, lee el Aviso de cookies de Amazon.